
Geofencing for Fleet Management: How It Works
Michael Bar
Geofencing lets me turn vehicle location data into automatic site records and alerts. Instead of watching a map all day, I can use it to log arrivals and departures, spot route issues, check time on site, and flag out-of-hours vehicle movement.
In most van tracking solutions, the tracker sends a vehicle position every 10 to 60 seconds. The software then checks that position against a virtual boundary around a depot, customer site, yard, or route. If the vehicle crosses the line, the system can:
- log an arrival
- log a departure
- flag long dwell time
- alert me to out-of-hours movement
- spot off-route travel
- warn about speed inside a set zone
To set it up, I would usually:
- pick the place I want to track
- draw a radius or polygon around it
- assign the right vehicles
- choose which events should be logged and which should send alerts
- test the boundary during normal site traffic
The main lesson is simple: good geofencing depends on good boundary size and good rules. If the area is too small, GPS drift can miss an entry. If it is too large, passing traffic can trigger false alerts. That is why clear site labels, small rule changes, and live testing matter.
A few points stand out:
- Entry and exit logs help with site records and driver check-ins
- Dwell-time data can support billing and SLA checks
- Route boundaries help me spot detours sooner
- After-hours alerts can help with theft risk and vehicle movement outside set times
In short, geofencing is less about the map itself and more about what happens when a vehicle crosses a line. That is what gives fleet teams tighter day-to-day control.
| Area | What geofencing does |
|---|---|
| Site arrivals | Records when a vehicle enters |
| Site departures | Records when a vehicle leaves |
| Time on site | Measures dwell time |
| Route control | Flags movement outside the planned path |
| Yard security | Alerts on out-of-hours movement |
| Setup quality | Depends on boundary shape, size, and alert rules |
Below, I break down how it works, how I would set it up, and where it helps most in day-to-day fleet control.
How Geofencing Works in Fleet Management
From Vehicle Location Data to Boundary Checks
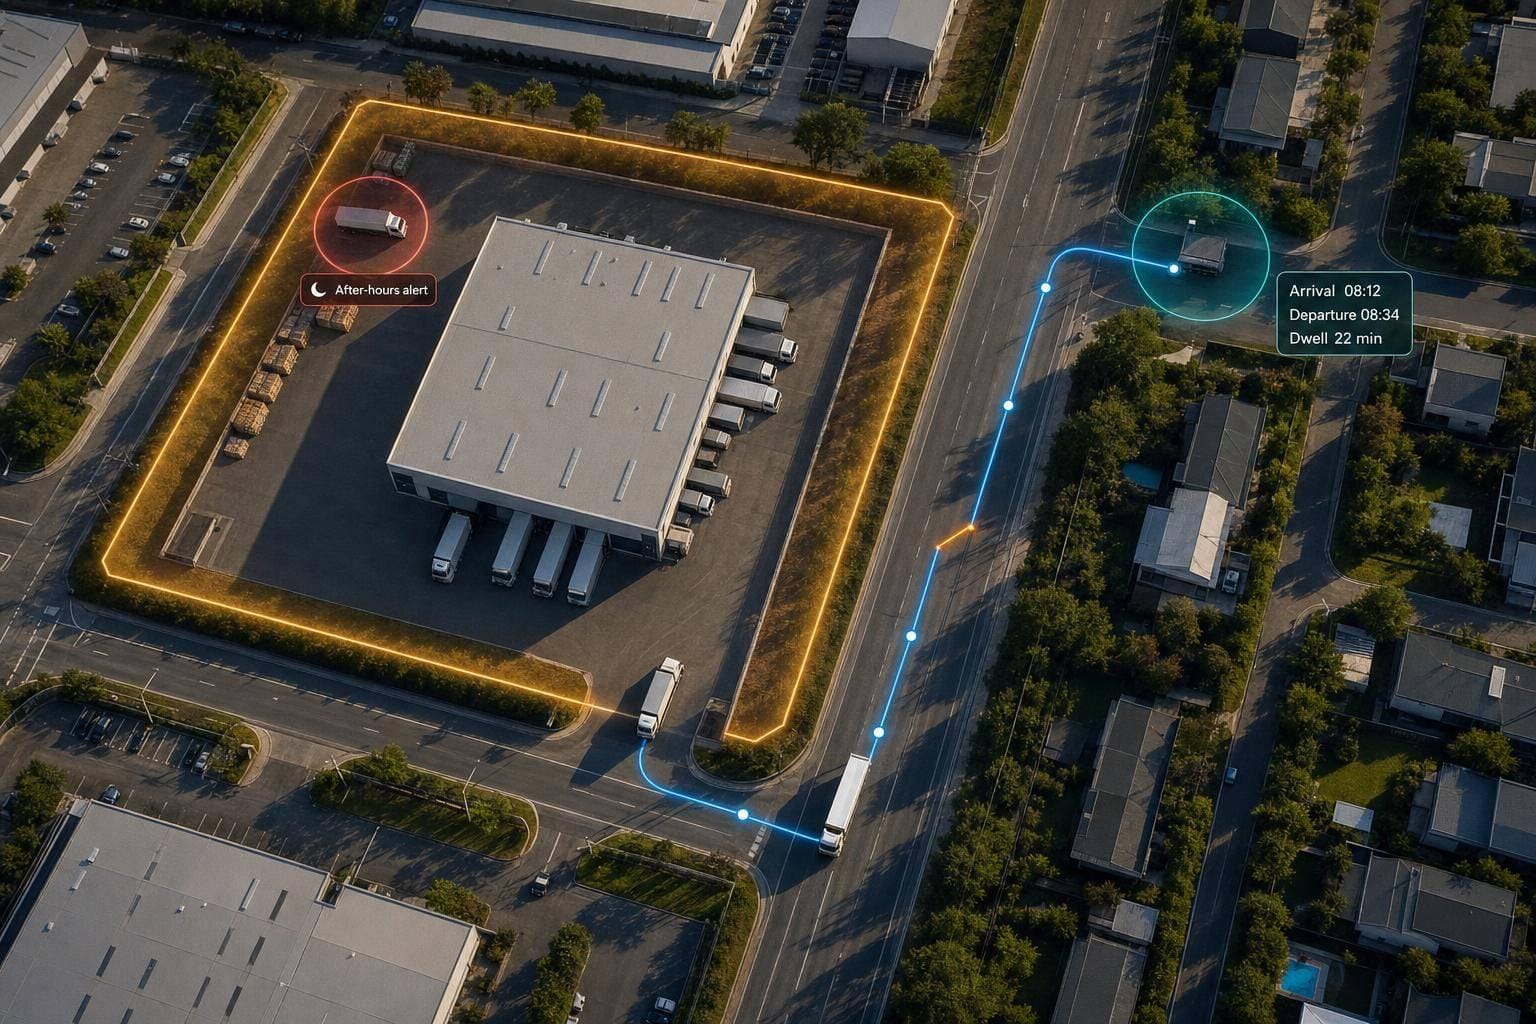
Each vehicle tracker sends its coordinates to the fleet platform every 10 to 60 seconds through a mobile or satellite network. The platform then checks each update against the geofence. If a vehicle enters or leaves the set area, the system triggers the rule you’ve chosen. That’s how basic location pings turn into arrival, departure, and security events.
Common Geofence Events and Alerts
Once the platform matches each location update to a zone, it can apply different rules for different jobs.
| Event Type | What It Means | Result for Fleet Managers |
|---|---|---|
| Entry Alert | Vehicle crosses into a defined zone. | Confirms arrival |
| Exit Alert | Vehicle crosses out of a defined zone. | Logs departure |
| Dwell-Time Alert | Vehicle stays inside a zone beyond a set limit. | Flags delays or idling |
| After-Hours Alert | Movement detected within or out of a zone during restricted times. | Warns of unauthorised movement |
| In-Zone Speeding | Vehicle exceeds a set speed limit inside a geofence. | Flags unsafe speed |
| Route Deviation | Vehicle moves outside a planned route. | Flags unauthorised detours |
How Alerts Support Day-to-Day Decisions
Each alert points to a practical next step. An entry alert lets a dispatcher confirm that a driver has reached a customer site without making a phone call. A dwell-time alert shows when a vehicle has stayed at one location much longer than planned, which helps teams spot delays fast.
It also pays to be selective. Send live alerts only for events that need immediate action. For routine activity, log the event without pushing a notification. That cuts noise and helps staff focus on the alerts that matter.
sbb-itb-499a7f0
Mastering Geofence , POI Setup & Alerts in Fleet Stack: GPS Software Tutorial
How to Set Up a Geofence: Step by Step
How to Set Up a Geofence for Fleet Management: 5-Step Guide
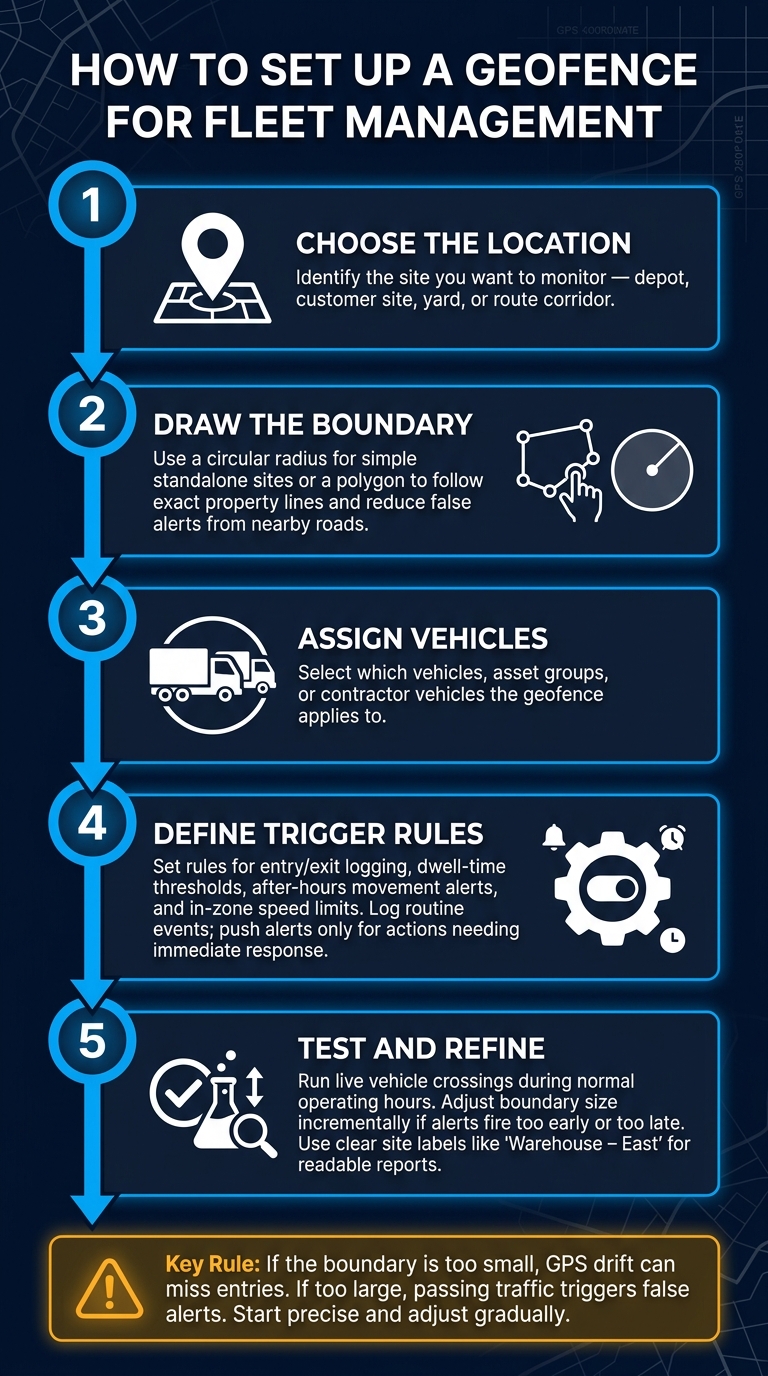
Choose the Location and Draw the Boundary
Start with the events you want to track. That tells you where the geofence should sit. Be precise about the area you need to monitor and what counts as being on site - whether that means a gated yard or the full property line.
Next, pick the boundary shape that fits the site. A circular radius is a good fit for simple, stand-alone locations like a single depot or warehouse. But if the site sits next to a busy road or has an awkward layout, a polygon usually makes more sense. It lets you follow the exact property outline and cut down false alerts from passing traffic.
Whatever shape you choose, add only the buffer you need to deal with GPS drift and the site layout.
Assign Vehicles and Define Trigger Rules
Once the boundary is in place, choose which vehicles, asset groups, or contractor vehicles the geofence applies to across different industries.
Then set trigger rules based on the information you need. Entry and exit rules track arrivals and departures. Dwell-time rules show how long a vehicle stays on site, which helps with billing checks or SLA compliance. After-hours rules flag movement outside working hours.
The main thing is to avoid noisy alerts. Log routine arrivals for reporting, and keep live notifications for events that need someone to act.
After that, assign each alert to the right person.
Set Notifications and Check Test Results
Send each alert to whoever can deal with it. Routine events can go by email. Urgent breaches are better sent by SMS or in-app alerts.
Before you roll this out across the full fleet, test the geofence at a busy site during normal operating hours. Run several live crossings as part of day-to-day work. If alerts fire too early or too late, tweak the boundary bit by bit instead of making big changes in one go. Keep adjusting until the alerts line up with real entries and exits.
It also helps to use site names that are clear from day one. Labels like "Customer – ABC Plumbing" or "Warehouse – East" make automated reports easy for the whole team to read.
Where Geofencing Improves Fleet Operations
Once geofences are live, the value comes from the decisions they automate.
Arrival Tracking, Site Compliance, and Route Oversight
One of the biggest gains is automated arrival and departure logging. When a vehicle crosses a geofence boundary, the system records the exact timestamp without driver check-ins. In plain terms, geofencing turns routine location pings into confirmed arrivals, with no manual input needed.
Dwell-time data takes this a step further. If a service van enters a customer site and stays there for a set period, that record can support billing, SLA checks, and site-time disputes. It can also serve as a service record, which helps when someone later asks, “How long was the vehicle actually on site?”
Route oversight works in a similar way. Corridor geofences sit around an approved route and flag deviations from that path, then alert operators straight away. That means teams can spot off-route movement as it happens instead of finding it later in a report.
The same setup can also help protect vehicles outside working hours.
Theft Awareness and Unauthorised Vehicle Movement
Vehicle theft remains a major UK risk, especially overnight. After-hours rules can flag unauthorised movement at depots or on-street parking locations. Place a boundary around your yard or approved operating area, limit it to the hours when vehicles should be stationary, and any movement triggers an alert straight away.
These gains depend on boundary size and trigger rules.
Common Setup Issues and Key Points to Remember
Boundary Size, Placement, and Rule Errors
Boundary size and trigger rules have a direct effect on results. So when geofencing goes wrong, the issue usually comes down to poor placement or too many noisy alerts.
A boundary that doesn't fit the site is the most common problem. If it's too small, it can miss arrivals because GPS drift may place a vehicle just outside the zone. If it's too large, it may trigger for vehicles that are only driving past on a nearby road.
For awkward-shaped sites or places with shared entry points, a polygon that follows the actual property line is often a better fit. It helps avoid the spill-over that a circular boundary can cause in built-up areas.
Not every movement needs an instant alert. Routine arrivals and departures should be logged rather than sent as live notifications. Push or SMS alerts are better kept for events that need action straight away, such as after-hours movement. When those rules are set up properly, the system is much more dependable.
Rules also need to line up with operating hours. Test the boundary with real vehicle visits, then adjust the rule window before rollout.
Conclusion: How Geofencing Supports Better Fleet Control
When it's set up well, geofencing gives fleet managers cleaner boundary checks and fewer false alerts. That turns live vehicle location data into more dependable day-to-day control across every site the fleet uses.
FAQs
How accurate is geofencing?
Geofencing accuracy mostly comes down to GPS, which usually pinpoints location within a few metres. That sounds precise, and in many cases it is. But in dense urban areas, tall buildings can throw signals off, so systems often lean on Wi-Fi, RFID, or cellular data to help keep tracking on course.
There’s also a practical side to it. Accuracy doesn’t depend on signal data alone; it also hinges on how the boundary is set up. If a geofence is too small, it can miss events altogether. If it’s too large, it may set off false alerts. That’s why testing and refining geofences matters so much in day-to-day use.
When should I use a radius or a polygon?
Choose a radius if you want the fastest setup, the site is small, or exact edge control doesn’t matter much. It works well for simple locations like standard warehouses or car parks.
Choose a polygon for sites with awkward or uneven shapes, especially those close to busy roads. It gives you tighter geographic control and can cut false entry or exit alerts that happen when the area includes too much of the space around it.
How can I reduce false geofence alerts?
Refine your boundary shapes so they match the site layout more closely. If a geofence is too large, nearby roads can trigger false arrivals. If it is too small, valid events can be missed.
Review geofences at least every quarter to remove outdated or duplicate zones. Keep visibility geofences separate from alert geofences. If the same non-essential alerts keep firing, switch them to report-only or turn them off to avoid notification fatigue.
Related Blog Posts
Related Articles

5 Jul 2026
Telematics Data Visualisation: ROI for Fleet Operators
Telematics dashboards reveal idling, route waste and fault codes to cut fuel, maintenance and incidents and show ROI at 3–12 months.
5 Jul 2026
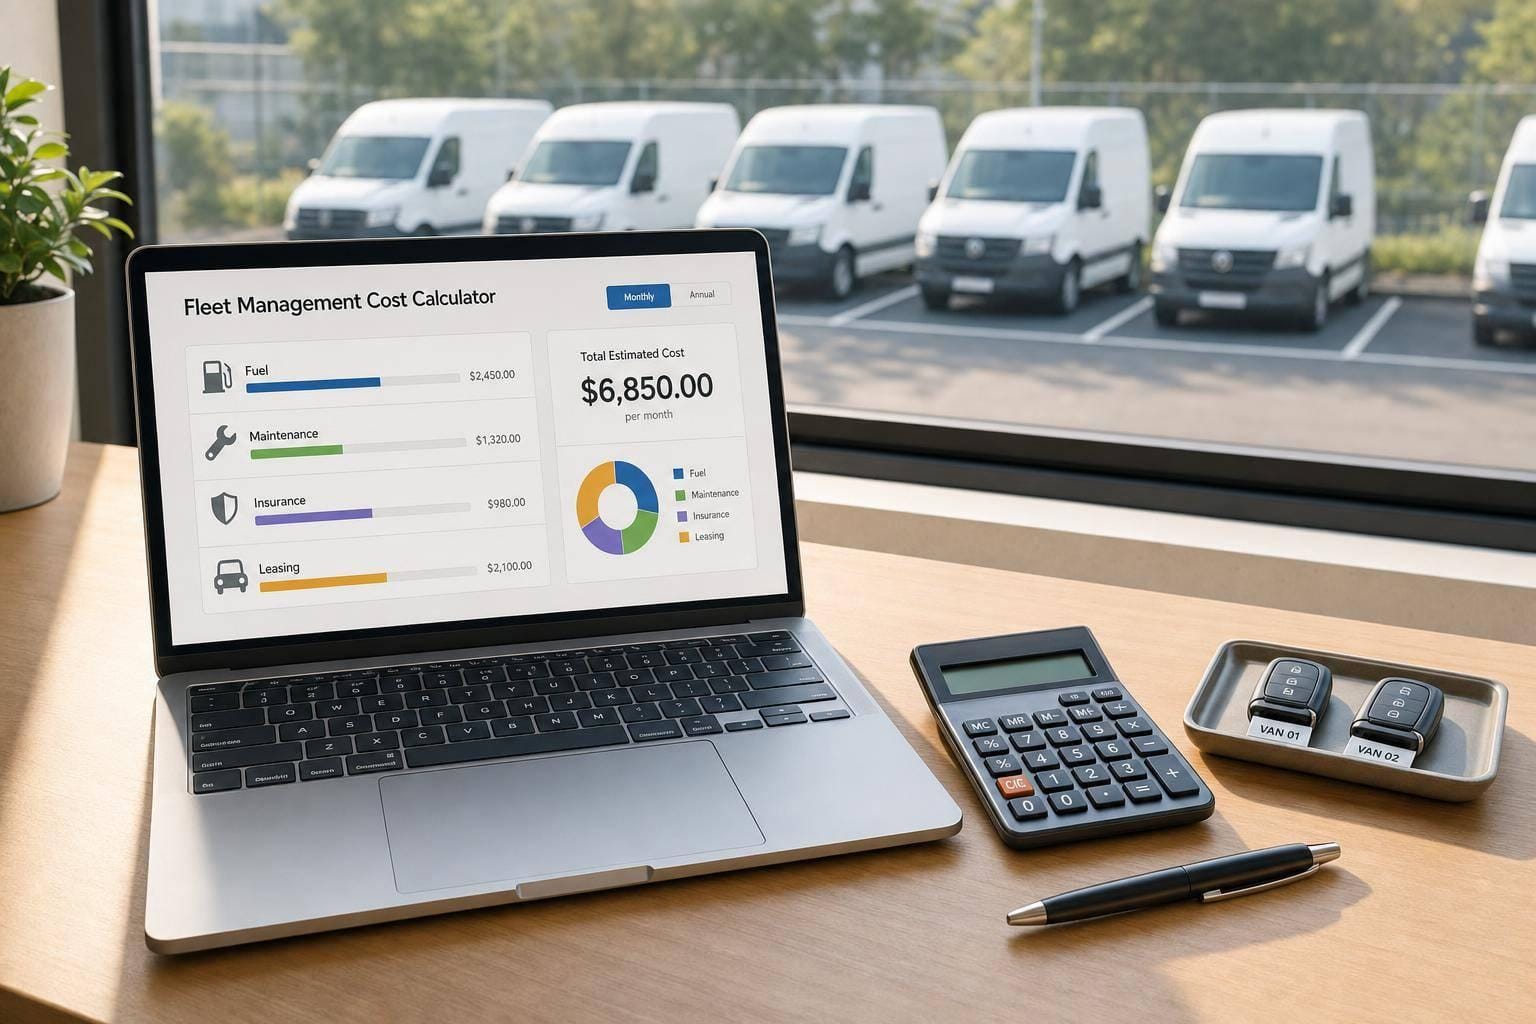
Fleet Management Cost Calculator
Estimate monthly or annual fleet running costs, compare cost categories, and plan budgets with a practical fleet management cost calculator.

4 Jul 2026
Historical Fuel Trends for Construction Fleets
UK construction fuel rose despite cleaner engines; measure fuel by engine hours, idle time and load with telematics for true performance.