How Fleet Teams Weatherproof Dash Cam Wiring
Standardise routing, sealed entries, protected joins, drip loops and 90‑day inspections to prevent water-related dash cam failures.
 By Michael Bar8 min read
Most dash cam wiring faults start with water getting into the cable run, not the camera body. If I want fewer camera dropouts, fewer post-wash faults, and fewer call-backs, I need to get five things right from the start: route cables inside where I can, seal body entry points, protect joins, add drip loops, and inspect the install every 90 days.
In plain terms, this means I should:
- Plan the route before drilling so less cable sits in rain, spray, dirt, and salt
- Use the right grommet or IP67+ gland for each entry point
- Treat bare metal and seal the opening to help stop rust and leaks
- Keep joins high and inboard instead of near low spots where water can sit
- Cover exposed runs with conduit and keep them away from hinges, pinch points, and hot parts
- Build in drip loops so water falls away before it reaches a connector
- Test after fitting and re-check after washdowns, winter road salt, and routine servicing
A lot of the trouble shows up in small ways first: random reboots, missed recordings, or faults after wet weather. Leave it too long, and moisture can lead to shorts, blown fuses, or full camera failure. An IP-rated camera does not protect the cable entry, the join, or the connector.
Here’s the short version: keep the cable run short, sealed, supported, and checked. That one approach works across vans, HGVs, and specialist vehicles, and it also helps when dash cams share a route with telematics kit.
This article boils the job down to the steps I’d standardise across a fleet.
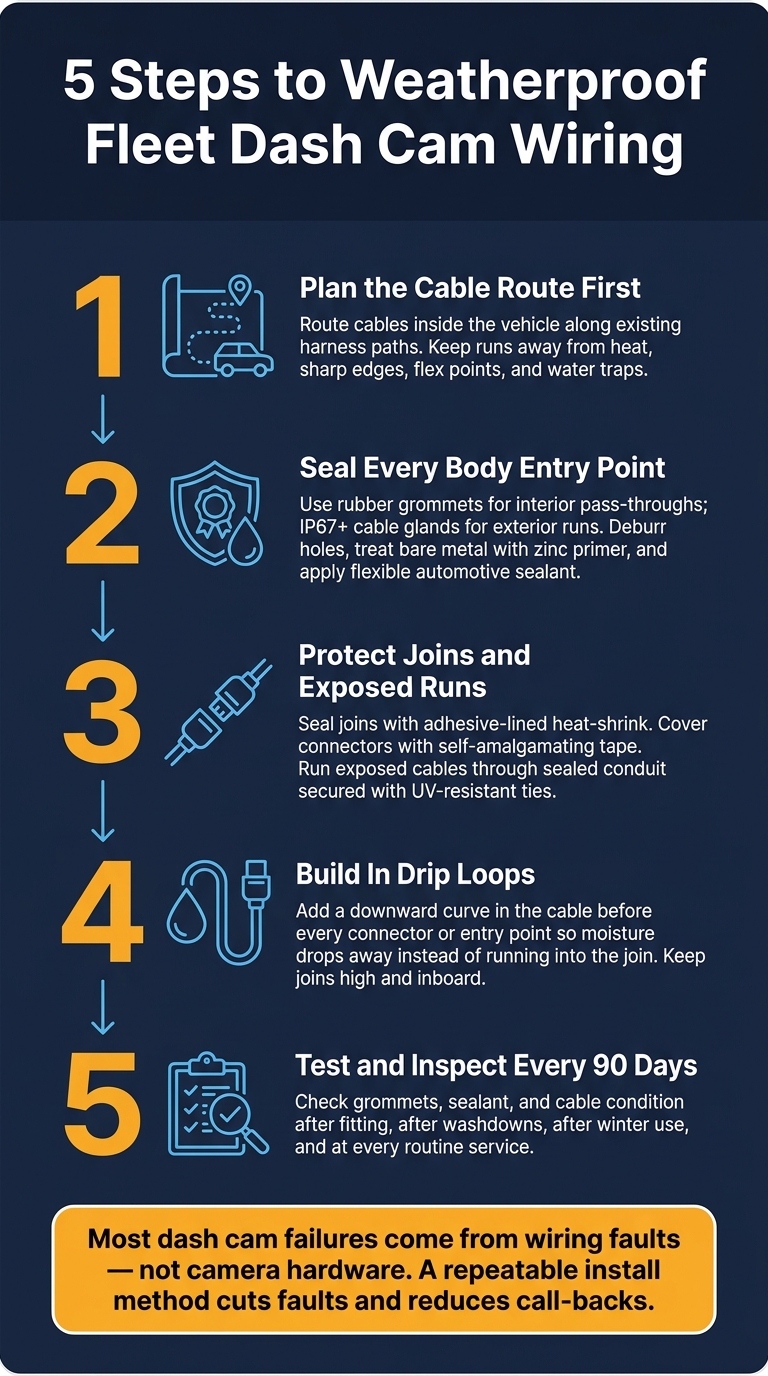
5-Step Fleet Dash Cam Weatherproofing Process
1. Plan the cable route before fitting
Start with the route, because every seal you add later depends on it. If the route is poor, the rest of the job is harder than it needs to be.
Good weatherproofing begins with planning. Keep as much cable inside the vehicle as you can before drilling, so less of it sits out in the rain.
Follow existing vehicle harness paths wherever possible. Manufacturers usually run looms away from heat, sharp metal edges and moving parts. For a dash cam, that often means tucking the cable behind the headliner, down the A-pillar and under the dashboard trim, using the same paths as the factory wiring.
That does a few things at once:
- It keeps the run neat
- It lowers the chance of damage
- It leaves far less cable exposed to the weather
Keep runs protected and avoid water traps
For forward-facing cameras, the cable will usually run from the windscreen, along the headliner and down the A-pillar to behind the dashboard. Rear-facing and side-camera runs are more exposed, so routing matters even more.
Don’t let the cable sag into a low spot near a connector. That’s an easy way to create a water trap. Instead, route cables away from entry points and keep joins as high and as far inboard as possible.
Account for flex points on commercial vehicles
Commercial vehicles move more than cars. Rear doors, tail lifts and body panels all flex in use, and the cable run has to deal with that.
Leave enough slack for movement, but not so much that the cable droops or snags. If a camera sits near one of these areas, route the cable so it moves with the vehicle. Then secure it at existing mounting points with clips or conduit to cut vibration wear and stop water from sitting around the run.
Once the route is fixed, seal every body entry point with the right grommet or gland.
2. Seal body entry points with the right hardware
Every point where the cable passes through a body panel needs the right hardware and a clean fit. Most leaks start at badly prepared holes, not the cable itself.
Check that the hole is needed first. Then drill the smallest opening that suits the hardware, deburr both sides, treat any bare metal, and fit the grommet or gland before sealing it. Skip the deburring or rust treatment, and you can end up with corrosion that slowly widens the hole and ruins the seal.
Match grommets and cable glands to the cable and panel
Use rubber grommets for short pass-throughs into protected areas. For exposed exterior runs, such as rear or roof-mounted cameras, use IP67+ cable glands. They give you a compression seal and a panel gasket, which is what you want where rain, spray, and road grime are part of daily life.
Pick the grommet or gland before you drill. Then size the hole to the manufacturer's spec. Even a slightly oversized hole can stop the gasket from seating properly and let water through. It’s a small detail, but it can make all the difference. A short off-cut of cable is handy here, as you can test the fit before final assembly.
Apply flexible automotive sealant and rust protection
Bare metal around a drilled hole can corrode fast in the UK's damp climate, especially on vehicles that run coastal routes or spend winter on salted roads. Before fitting any hardware, coat the cut edge on both sides with zinc-rich primer or rust-inhibiting paint, then let it cure fully.
Once the metal is treated and the grommet or gland is fitted, apply a thin, continuous bead of flexible automotive sealant around the base of the hardware. Use silicone for interior joints and polyurethane sealant for exterior bodywork. Smooth it into a shallow fillet so water runs away rather than sitting around the entry point. Go easy with the sealant too. Too much can trap moisture instead of keeping it out.
Choose safer entry locations on vans and HGVs
Entry points should sit above the water run-off line and away from direct splash zones. On vans, that usually means high bulkhead pass-throughs or factory grommets in protected door jambs. On HGVs, better options include rear bulkheads above mid-height, existing loom entries behind fairings, or roof entries under visor panels.
Factory grommets and knockouts are worth using wherever possible. OEM penetrations are often sealed better than anything added later, and they cut down on fresh drilling. On many UK vans, rear camera installs can reuse boot-lid or tailgate grommets without drilling at all. Sharing an existing loom entry can also reduce new penetrations in the body shell, which means fewer exposed joints to weatherproof in the next stage.
Once the body entry is sealed, protect any joins and exposed runs that still sit outside the cab.
3. Protect joins, connectors and exposed cable runs
Once the body entry is sealed, the next job is protecting the joins and any cable that stays exposed after that point.
Run rear and side camera cables through sealed conduit or protected body channels, not through open gaps.
Seal joins and shield connectors
Seal every join with adhesive-lined heat-shrink. Then cover exposed connectors with self-amalgamating tape or a sealed cover. That helps stop movement from working moisture into the joint, which is a common issue on vans with rear doors or tail lifts, where vibration and flex are constant.
For longer exposed runs, use sealed loom tubing and secure the cable to the factory harness with UV-resistant ties to prevent loosening. Keep cables clear of pinch points, hinges, exhausts and moving parts.
Leave the cable path clean and easy to access so drain paths and post-fit checks are simple to verify.
4. Build in drain paths and test every installation
Once the entry point is sealed, finish the job by giving moisture somewhere to go and checking the install properly. Sealing holes and covering joins is only half the work. If any water reaches the cable, it needs a path away from connectors and entry points.
Create drip loops and keep joints out of splash zones
A drip loop is a downward curve in the cable before it reaches a connector or body entry point. That way, any moisture drops off the cable instead of running straight into the join. Add one anywhere a cable goes from an exposed run into a sealed entry or connector.
Use the loop to throw water clear, then place the join high and out of spray. Keep joins and connectors inside the cab, above the lowest run point - behind the headliner, along the windscreen edge, or under the dashboard. Stay away from pinch points, door hinges and door shuts, which are prone to both mechanical wear and moisture ingress. For rear or side-mounted cameras, keep any external run that can't be avoided short and protected from spray.
Run post-fit checks after fitting and during maintenance
Once the installation is done, check it instead of assuming it's watertight. Look over every grommet and sealant point, and inspect exposed cable runs for any sign of damage. Power the camera on and make sure it records cleanly. Re-check grommets, sealant, cable condition and recording at each routine service.
Do the same checks after every service, after washdowns and after winter use.
Conclusion: Standardise weatherproof dash cam wiring across the fleet
Weatherproof dash cam wiring comes down to five basics: protected routing, sealed entries, sealed joins, drip loops, and post-fit checks. After that, the job is simple in theory and harder in practice: do it the same way across the whole fleet.
Make that method the fleet standard, not something that changes from installer to installer. In fleet use, most dash cam failures come from power and wiring problems, not camera hardware defects. That means a repeatable install method can save time, cut faults, and reduce call-backs over the long run.
This becomes even more important when vehicles carry more than one onboard unit. If dash cams are fitted alongside GRS Fleet Telematics tracking hardware, use one sealed route for both units where possible. That can cut down on drilling and make inspections easier.
Once the install is done, keep the standard in place with routine checks. Inspect grommets, sealant, and cable condition every 90 days.
FAQs
How do I choose the right cable gland or grommet?
Choose a cable gland or grommet that matches the dash cam cable diameter, so you get a tight, weather-resistant fit. It also needs to sit snugly against the vehicle’s metal entry point to help stop water getting in.
Go for durable, high-quality materials that can handle vibration and temperature swings in commercial vehicles. Proper sizing matters here: if it’s too loose, it won’t seal as it should. If the size is wrong, it can pinch the cable or damage the wiring.
Where should dash cam cable joins be placed on a van or HGV?
Place all cable joins inside the vehicle cabin or in protected, dry internal cavities.
Don’t put connectors in exposed spots like door hinges, exterior panels or areas near water entry points. Secure the cabling to existing vehicle harnesses so it doesn’t move around, and keep joins away from pinch points, high-heat areas and footwells where they could be damaged or come loose.
How can I tell if water ingress is causing camera faults?
Check physical connection points for signs of corrosion or debris. It’s also worth looking for recording errors, missing or corrupted files, or sudden shutdowns, since moisture can interfere with electrical integrity.
Regular maintenance, along with remote health checks through diagnostic tools or a mobile app, can help spot faulty hardware or recording failures early.